Southern Cuillin Ridge Munros Traverse
Traverse and scramble the Cuillin Ridge from Sgùrr nan Eag to Sgùrr a' Mhadaidh, including the In Pinn, Sgùrr Alasdair & Sgùrr Mhic Choinnich.
Route outline
| Munros | ||||
| Ascent | 2440m (8000ft) | |||
| Distance | 18km (11m) | |||
| Time | 9:00hr | |||
| Start | Glenbrittle Campsite, Isle of Skye Grid Ref : NG412205 | |||
| Finish | Glenbrittle Youth Hostel Grid Ref : NG410225 | |||
| Terrain |
| |||
| Nav |
| |||
| Effort |
| |||
| Scenery |
| |||
The southern section of the Cuillin Ridge on the Isle of Skye offers one of Scotland's most thrilling mountaineering experiences. This route combines exposed scrambling, technical terrain, and iconic Munro summits - including Sgùrr Alasdair, Sgùrr Mhic Chòinnich, and the infamous Inaccessible Pinnacle on Sgùrr Dearg, the hardest of all Munros.
Tackled as a continuous traverse, the day begins and ends with more straightforward walking through Coir' a' Ghrunnda and Coire a' Ghreadaidh, while the central stretch demands full focus and route-finding skill. Expect sustained Grade 2-3 scrambling, particularly on the ascent to Sgùrr Alasdair from Coire Ghrunnda, the descent from Sgùrr Thearlaich to Bealach Mhic Chòinnich, the north ridge of Sgùrr Mhic Chòinnich, the south-west ridge of Sgùrr a' Ghreadaidh, and the climb up the In Pinn - where rope, harness, and abseil experience are essential.
Although Skye's gabbro rock provides excellent grip in dry conditions, parts of the ridge are loose or polished and can become dangerous when wet. This route is suitable only for experienced scramblers with prior exposure to technical ridges such as the Aonach Eagach, Liathach, or An Teallach.
With the right conditions and preparation, the Cuillin Ridge South promises a spectacular and rewarding day - a true highlight of UK mountain scrambling.
For those who prefer to tackle the peaks in shorter outings, the ridge can be broken down into more manageable sections - see the links below for detailed route descriptions.
OS maps can be unclear in this terrain - Harvey's Superwalker map and the SMC's Scrambles on Skye guidebook are highly recommended (see below). Alternatively, hiring a guide can enhance enjoyment and safety - The Highland Mountain Company offers experiences like a 2-day Cuillin Ridge Traverse, a 4-day Munro course or tailored experiences.
Show map
Route description
1. Getting to Glenbrittle

The Black Cuillin from Glenbrittle
From Sligachan on the A87, take the A863 west towards Carbost. After a few miles, as you approach Loch Harport, turn off for Carbost. Just before entering the village, you'll reach a junction by a rough campsite - take the narrow road to the left signposted for 'Glen Brittle.'
This single-track road with passing places passes a large car park for the Fairy Pools then drops into the glen, passes the Glenbrittle Youth Hostel and continues to the road-end by the entrance of Glenbrittle Campsite.
This route starts from the campsite and ends by the hostel which are around 2km apart. Roadside parking is available by these locations.
2. Sgùrr na Eag and Sgùrr Dubh Mòr

Coir' a' Ghrunnda from Sgùrr nan Eag's crest
From Glenbrittle Campsite, begin by taking the stile behind the wash block to follow a good path climbing east. Soon reaching a junction  , keep right to cross a burn and continue following the path south-east below Coire Làgan.
Shortly after, a higher-level path branches left  , traversing beneath Sròn na Cìche (the lower path heads for Gars-bheinn) and turns north into Coir' a' Ghrunnda. The route steepens over bouldery ground, eventually reaching an easy scramble alongside the Allt Coir' a' Ghrunnda. This leads to the magnificent amphitheatre of Coir' a' Ghrunnda itself, with Loch Coir' a' Ghrunnda nestled beneath towering crags.
Cross the loch's outflow  and skirt the southern shore to reach Sgùrr nan Eag's northern slopes. An ascent over boulders and light scrambling gains the summit ridge and the cairn-topped Munro summit
  , offering expansive views south to Gars-bheinn and beyond.
Continue by retracing your steps along Sgùrr nan Eag's crest, then following the ridgeline north towards Sgùrr Dubh an Da Bheinn, bypassing Caisteal a' Garbh Choire  on its east flank.
From the small gap north of Caisteal a' Garbh Choire, Sgùrr Dubh Mòr can be tackled as a there-and-back from Sgùrr Dubh an Da Bheinn, a 'Munro Top', or can be aimed for direct - one advantage of aiming for Sgùrr Dubh an Da Bheinn first is the option of having some respite from carrying a rucksack !
A straightforward and scenic scramble leads up the southern shoulder to Sgùrr Dubh an Da Bheinn's summit  , from where a descent eastwards begins. A direct route can be made to the next col
  , though there is an easier option of picking up a faint path that skirts below the north side of the ridge.
From the col a series of ledges, short scrambles, and a squeeze through a rock gap lead to the narrow, airy summit of Sgùrr Dubh Mòr  .
.

Route up Sgùrr Dubh Mòr from the col

Route up Sgùrr Dubh Mòr from the col
3. Sgùrr Alasdair

Route up Sgùrr Alasdair from Sgùrr an Dà Bheinn
From the summit of Sgùrr Dubh Mòr, carefully retrace your steps back to the col. You can return to Sgùrr nan Dà Bheinn by descending the scree and passing beneath the dark buttresses. Alternatively, the more direct route continues up the ridge ahead. This line appears more obvious from the col than it did earlier from Sgùrr nan Dà Bheinn, and it generally feels easier to ascend than to descend - however, it is significantly more exposed than the path beneath the buttresses.
Once back on Sgùrr an Dà Bheinn  , begin heading northwest along its crest, gradually losing height. There are no major difficulties - just a few sections of easy scrambling and some minor route-finding. You'll soon reach the next col, Bealach Coir' an Lochain
  .
.
Continuing along the ridge from this point involves tackling the infamous Thearlaich Dubh Gap (affectionately known as the 'TD Gap'). This is a very exposed notch that requires proper climbing equipment and experience, and is not suitable for most scramblers.
Fortunately, the TD Gap can be avoided. From the bealach, contour left beneath the steep, south-facing buttresses of Sgùrr Alasdair, aiming for the top of the loose scree fans. A faint path can usually be followed to a small cave  , located just below the bealach between Sgùrr Alasdair and Sgùrr Sgumain
  .
.
From the cave, it may be tempting to head directly up to the bealach, but be warned - this leads to a difficult and exposed bad step which blocks progress. A better option is to traverse below the crest, across some loose ground to the right, until you reach the base of a large, dark chimney (there are two chimneys - take the larger one on the right). It looks awkward, but the scramble up is more manageable than it first appears.

Chimney on Sgùrr Alasdair's western flank
 , the highest peak in the Cuillin. It's a spectacular place to pause and take in the views.
Chimney on Sgùrr Alasdair's western flank
4. Sgùrr Theàrlaich

View from Sgùrr Alasdair over Sgùrr Theàrlaich to Blaven
From the summit of Sgùrr Alasdair, straightforward scrambling descends eastwards and along a fairly obvious line. Briefly turning south-east, the scrambling ends by a circular stone shelter on the Coir' a' Ghrunnda side of the top of the Great Stone Shoot  .
.
If a quick descent is needed, the Stone Shoot leading down to Coire Làgan is your escape route. Be cautious as much of the finer scree has already been displaced to the bottom, making the upper section particularly awkward and tough on the ankles (see the Sgùrr Alasdair from Glenbrittle page for more detail).

Route options to get onto Sgùrr Thearlaich
 .
.
Route options to get onto Sgùrr Thearlaich
5. Sgùrr Mhic Choinnich

Descent options as seen from Bealach Mhic Choinnich
Continue northwards along Sgùrr Thearlaich's crest, descending over a very airy and exposed section, which then leads to a short plateau and a dead end.
At this point, there are a couple of options (see photo) - either abseil directly down or retrace slightly and look for a loose, scrambleable route down a cleft on the Coire Làgan side of the crest. The second option is easier but involves some route-finding and requires careful footwork on loose and unstable rock.
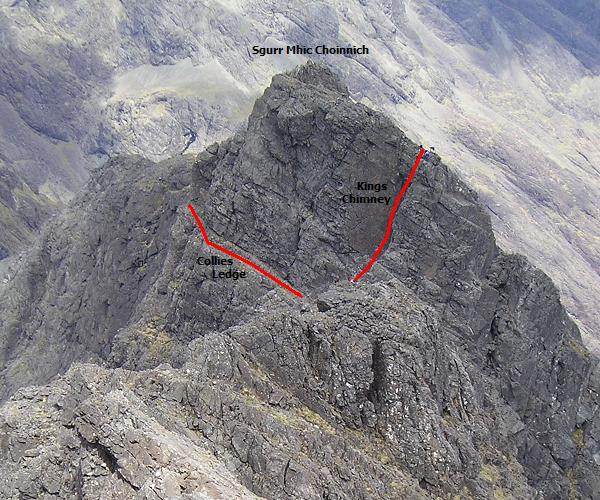
Dropping into Bealach Mhic Choinnich, Sgùrr Mhic Choinnich towers above and ahead. The direct route to the summit is via King's Chimney, but this is a roped climb.
Fortunately a ledge leading off to the left, Collie's Ledge, offers an easier route. To reach this ledge requires dropping a little from the bealach, then scrambling up. Travelling around the west flank of the mountain, the route following Collie's Ledge is fairly straightforward, though is quite exposed with a couple of short, slightly broken parts. The ledge drops a little near its end before leading to a nick  on the ridge just north of Sgùrr Mhic Choinnich's summit.
From the nick and onto the crest of Sgùrr Mhic Choinnich's northern ridge, more exposed scrambling follows. A couple of sections demand extra attention - after a minor dip, a rocky knoll requires a direct climb, then the route follows the left (eastern) side of the crest, where the rock slants and is rather smooth for my liking !

Route options to Sgùrr Mhic Choinnich as seen from Sgùrr Thearlaich's crest
 is reached - a sharp, compact top with modest shelter tucked beneath its western side. Remnants of an old memorial plaque can still be seen embedded in the summit cairn.
Route options to Sgùrr Mhic Choinnich as seen from Sgùrr Thearlaich's crest
6. Sgùrr Dearg

Scramblers descending Sgùrr Mhic Choinnich towards the plateau
Return to the top of Collie's Ledge  via the same route. From here, the technical difficulty eases, and the terrain becomes more straightforward. The ridge offers enjoyable, mostly easy scrambling, with little exposure. Staying slightly on the Coire Làgan side of the crest, the descent begins over dark, occasionally polished rock. Route-finding may involve some trial and error - look out for crampon scratches which often hint at the best line.
A welcome flat plateau soon appears, offering a brief pause before the next stage. From here, a short and easy scramble over minor rock outcrops leads down to the Bealach Coire Làgan  , situated just above the An Stac Screes - a loose but manageable escape route descending into Coire Lagàn (see the In-Pinn, Choinnich and Banachdich page for more details).

Looking along Sgùrr Mhic Choinnich's plateau and the route to Sgùrr Dearg
 and Sgùrr Dearg's top
  .
.
Looking along Sgùrr Mhic Choinnich's plateau and the route to Sgùrr Dearg
7. Inaccessible Pinnacle

The Inaccessible Pinnacle
The Inaccessible Pinnacle is a popular challenge, with guided parties approaching from other directions. Its base is a natural gathering point, with most climbers ascending via the exposed east ridge and abseiling down the steep western face. Though technically graded as a 'Moderate Climb', the real challenge lies in the sustained exposure rather than the difficulty of the moves.
The climb begins up a short groove before continuing along the narrow crest. A key move involves stepping past a seemingly loose - but firmly wedged - block. Most rope teams split the climb into two pitches, with the upper section being slightly easier. On the summit rests the distinctive Bolster Stone  , which many touch rather than stand on.

Abseiling down the Inaccessible Pinnacle

Abseiling down the Inaccessible Pinnacle
8. Sgùrr na Banachdich

Descending Sgùrr Dearg towards Bealach na Coire Banachdich
From Sgùrr Dearg's summit, follow the ridge briefly northward. To the west, several faint paths descend across loose scree and stony ground - these soon converge into a single line that drops with a bit of light scrambling to a small rock window, offering a perfectly framed view of Blà Bheinn to the east.
Beyond the window, more easy scrambling leads down to Bealach Coire na Banachdich  . From here, the ridge curves northwest, skirting around Sron Bhuidhe and beginning to rise again. Initially, the path sticks to the crest, but it soon forks
  - one branch keeps to the ridge, the other traverses below it to the left.
Staying on the crest offers the more direct line, though it involves some Grade 2 scrambling over a couple of minor summits - one of which is fairly exposed. The lower variation avoids the scrambling but is often on loose, steep ground with some vague route-finding, and higher up loses height, requiring re-ascent.
Once past the final high point, the ridge widens and the terrain becomes more forgiving, leading to the broad northern summit of Sgùrr na Banachdich  , where expansive views reward the effort.

On Sgùrr na Banachdich, In-Pinn behind and view to Rum

On Sgùrr na Banachdich, In-Pinn behind and view to Rum
9. Sgùrr a' Ghreadaidh

Sgùrr a' Ghreadaidh from Sgùrr na Banachdich
To continue along the ridge, leave Sgùrr na Banachdich heading initially north-west, then descend north-east on loose scree. Some easy scrambling leads to a short col, offering a fine view across to Blà Bheinn.
Climb directly up the rocky slope ahead to reach the summit of Sgùrr Thormaid  . Though it appears intimidating at first, careful route-finding around some pinnacles reveals an easier line than expected. The descent on the far side involves loose ground and requires care.
Skirt around the Three Teeth to the right (south) - though the left-hand side may also be feasible (I haven't taken that line). Shortly afterwards, a broad, flat col  is reached where a low circular stone shelter offers a fine place to pause.
From here, the ridge steepens and narrows as it climbs towards Sgùrr a' Ghreadaidh. Scrambling resumes in earnest, and although initially straightforward with the occasional ledge to pause, the route becomes increasingly exposed and sustained. Full concentration is needed as the terrain grows more serious. Eventually, the south top of Sgùrr a' Ghreadaidh is reached.

Sgùrr a' Ghreadaidh from the ridge below the Three Teeth
 from the far side.
Sgùrr a' Ghreadaidh from the ridge below the Three Teeth
10. Sgùrr a' Mhadaidh and return to Glenbrittle

Scrambling up Sgùrr a' Mhadaidh with Sgùrr a' Ghreadaidh behind
Beyond Sgùrr a' Ghreadaidh, the intensity of the scrambling begins to ease, giving way to looser, stony ground. Begin the descent, bypassing The Wart  - a distinctive overhanging rock feature - on its left (west) side. Continue down fairly easy terrain to a slightly awkward dyke where some caution is needed.
Pass the top of the dramatic Eag Dubh  - a striking cleft on the Glenbrittle side of the ridge - and continue to reach the top of An Dorus
  , a narrow and steep-sided notch. Though the downclimb is short, it's steep and can feel exposed. Face the rock and descend carefully, working diagonally from left to right to reach the top of the screes below. The holds are generally solid.
From An Dorus, face the rock on the Sgùrr a' Mhadaidh side and begin scrambling up a slab. After a few metres, move left (west) to pick up a faint path where the scrambling eases. The ground remains loose and stony but the ascent is straightforward.
Follow the twisting line of the path - first north, then east - as it rises to meet the crest of Sgùrr a' Mhadaidh a short distance south of the summit  .
.
The top of Sgùrr a' Mhadaidh provides a superb, airy perch, with sweeping views across its jagged northern tops and the skyline of the northern Cuillin silhouetted behind.

On Sgùrr a' Mhadaidh looking over its tops towards the northern Cuillin peaks
 . Begin dropping into Coire an Dorus with some easy scrambling, then down loose boulders and scree. As the gradient and terrain ease, a path becomes more defined. Follow it alongside the Allt a' Choire Ghreadaidh, to cross it
  , then passing some beautiful waterfalls before reaching Glenbrittle Youth Hostel - a scenic and fitting end to a remarkable traverse of the southern and central Cuillin Ridge.
On Sgùrr a' Mhadaidh looking over its tops towards the northern Cuillin peaks
Route profile »

Maps and GPX downloads »

|
Download GPX of route |

|
Open route in OS Maps |
The rock on Skye is magnetic in places and can therefore occasionally render a compass unreliable. Overhanging rock can also interfere with GPS signal.
Information on maps and GPX files is on this page.
The map images above link to items on Amazon. A small commission is earned on any map purchased which helps fund the operating costs of this website.
Weather forecasts »
| Regional | MWIS - Northwest Highlands |
| Peak specific | Mountain Forecast.com Met Office YR.no |
| Seasonal | SAIS - Torridon Midge forecast |
Alternative and nearby routes »
Sgùrr nan Eag & Sgùrr Dubh Mòr route | |

|
A scenic Black Cuillin route from Glen Brittle, ending with scrambling ledges to reach the airy summit of Sgùrr Dubh Mòr. Peaks : 2 Munros
Ascent : 1380m (4530ft) Distance : 14km (9m) Time : 5:50hr |
Sgùrr Alasdair via Great Stone Chute | |

|
A climb up Skye’s highest peak from Glenbrittle via Coire Làgan and the Great Stone Chute, ending in a short but exposed scramble. Peaks : 1 Munro
Ascent : 1025m (3360ft) Distance : 14km (9m) Time : 5:50hr |
Inaccessible Pinnacle & Sgùrr Mhic Chòinnich | |

|
A demanding Cuillin day with airy scrambles on Sgùrr Dearg, Sgùrr Mhic Chòinnich & Sgùrr na Banachdich—includes the In Pinn climb and abseil. Peaks : 2 Munros, option of additional Munro
Ascent : 1450m (4760ft) Distance : 10km (6m) Time : 7hr |
Sgùrr a' Ghreadaidh & Sgùrr a' Mhadaidh route | |

|
A steep, dramatic Cuillin ascent via An Dorus from Glenbrittle, with scrambling to reach both Munro summits of Sgùrr a' Ghreadaidh and Sgùrr a' Mhadaidh. Peaks : 2 Munros
Ascent : 1450m (4760ft) Distance : 10km (6m) Time : 7hr |
Northern Cuillin Munros Scrambling Route | |

|
From Sligachan, a route tackling Sgùrr nan Gillean, Am Bàsteir & Bruach na Frithe with exposed Grade 3 scrambling and an optional Tooth Chimney abseil. Peaks : 3 Munros
Ascent : 1550m (5090ft) Distance : 15km (9m) Time : 6:45hr |


